


Trying to work out how to install Cyberpunk 2077 mods without the game breaking after every patch? This guide belongs to my main Cyberpunk 2077 section, where I explore Night City in detail. Below, we will go through both working methods step by step: manual installation and the Vortex manager. We will also cover dependencies and frameworks so you can build a stable mod setup without crashes or library conflicts.
Two approaches: Vortex or manual installation
There are two main approaches, and the right way of installing Cyberpunk 2077 mods depends on how much control you want over the file structure.
- Vortex Mod Manager is a convenient Cyberpunk mod installation tool that handles the hard work: dependency tracking, automatic updates, and deployment management. It is ideal if you want 50+ mods without manually tracking every framework update.
- Manual installation It gives you complete control over where each file goes. Some complex mods actually work better with this approach, and you’ll know exactly what happens if something breaks.
Both methods work with versions of Steam, GOG and Epic Games Store. The key difference is how much file management you are willing to take on.
Method 1: setting up Vortex Mod Manager, recommended for most players
Preparing Vortex for Cyberpunk
First, create a free account on nexusmods.com and download Vortex. Installation is simple, but Cyberpunk needs specific settings to work correctly. To learn how to install mods through Vortex without mistakes, follow these steps.
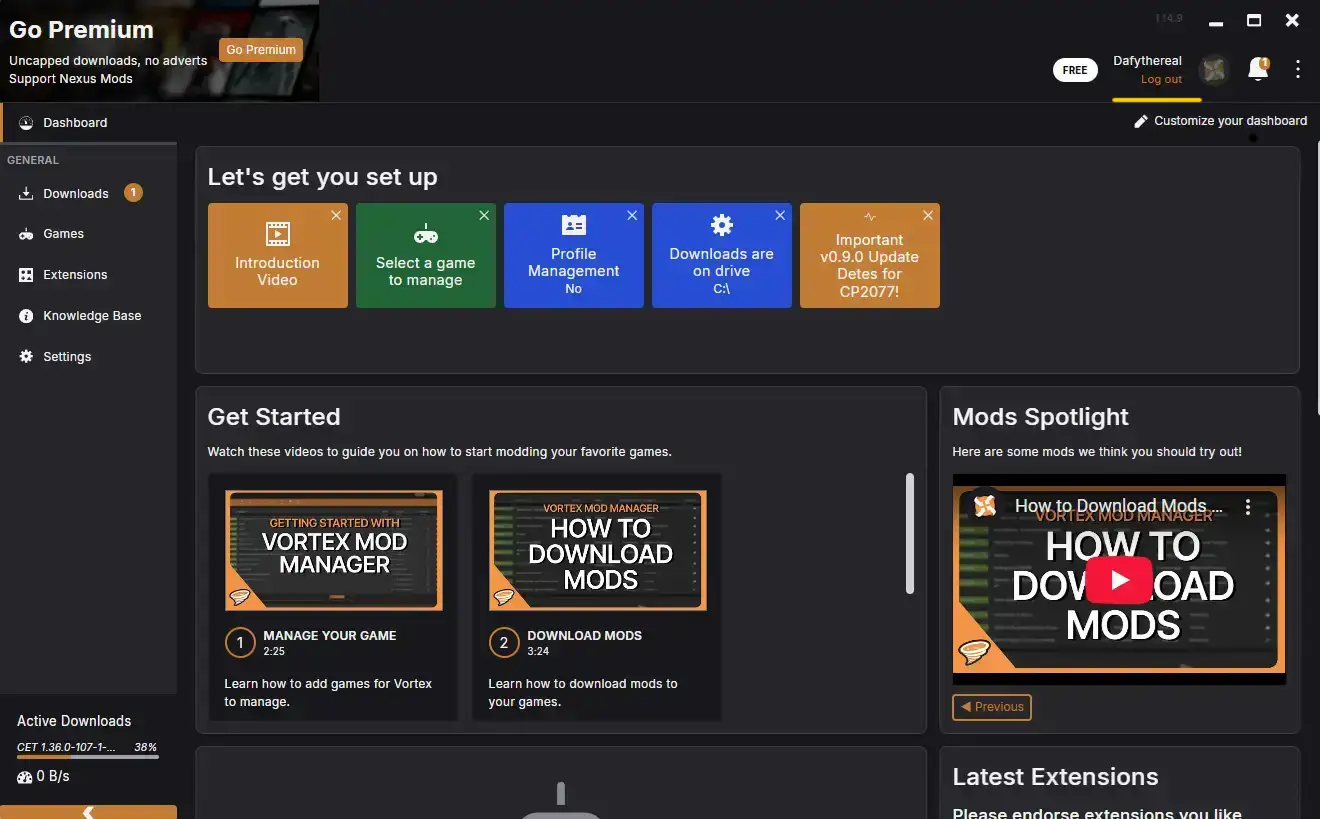
After the launch of Vortex:
- Sign in to your Nexus account via Vortex.
- Go to the “Games” section on the sidebar.
- Find Cyberpunk and press Manage.
- If you see “Game support not installed”, click Download to download the plugin for Cyberpunk.
- Restart Vortex when prompted.
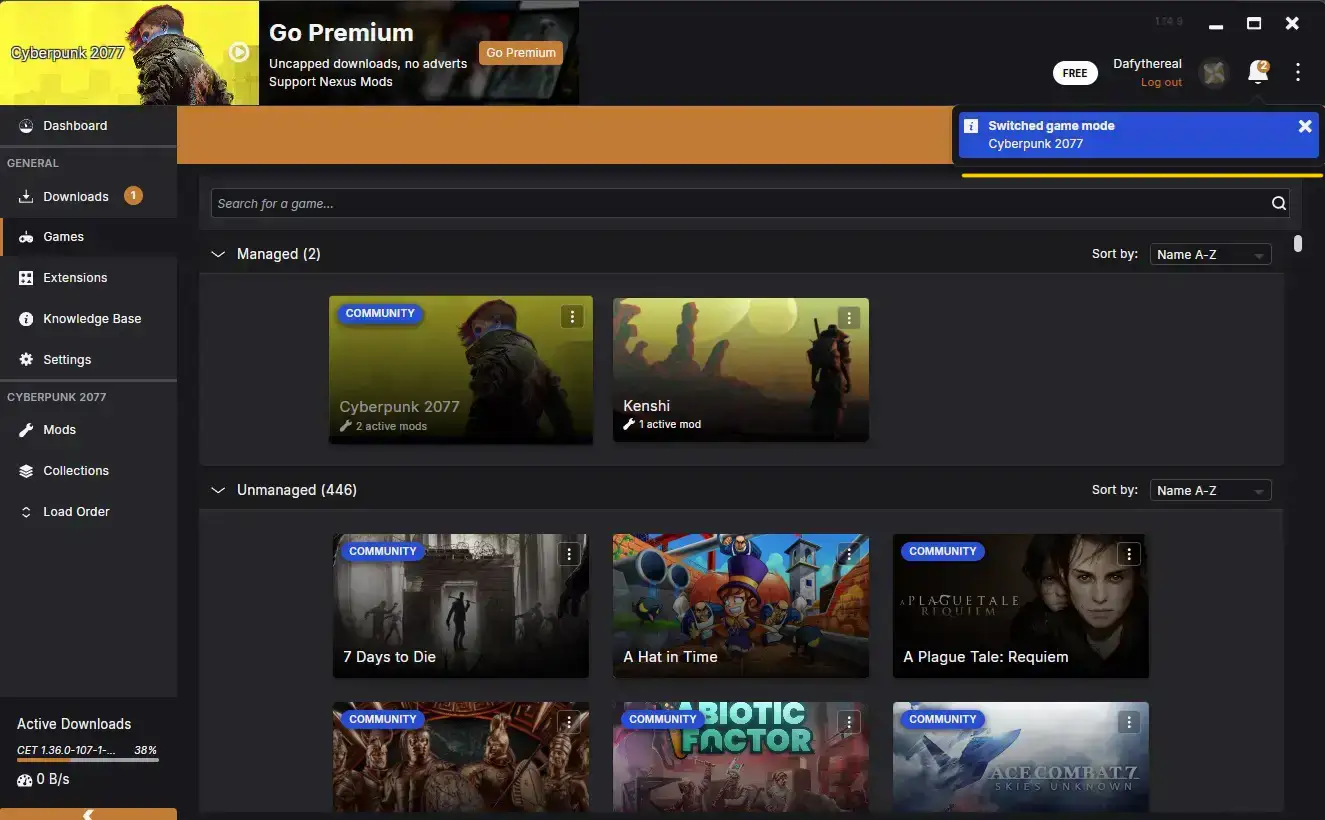

Vortex should detect the game folder automatically. If it does not, point it to your Cyberpunk 2077 installation folder.
Essential Vortex settings
In Vortex Settings, enable these automation options so that installing Cyberpunk mods goes smoothly:
- Deploy when Enabled
- Enable when installed
- Use hardlink deployment; this prevents many common problems.
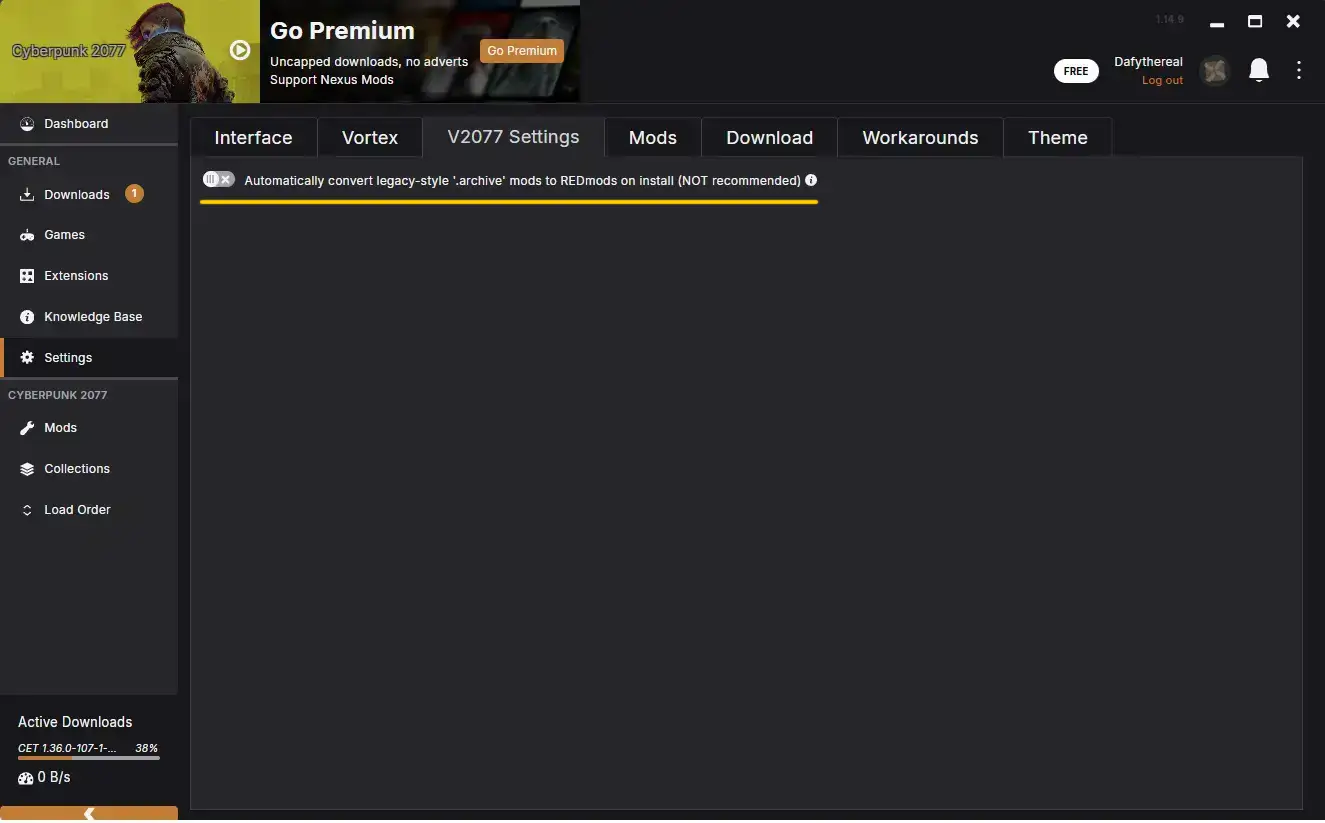
- Disable “automatically convert legacy style archive mods to red mods”; automatically converting old archive mods to REDmod breaks many older mods.

Installing mods via Vortex
The process is simple when everything is set up:
- Browse Cyberpunk 2077 mods on Nexus, check out my Cyberpunk mod selections, or use the more convenient collection with mods grouped by topic.
- Click “Mod Manager Download” on any mod page.
- Use “Slow Download” for free accounts.
- The mod will automatically appear in your mods list in Vortex.
- Click “Enable” next to the mod.
- Vortex will deploy it to the game folder.
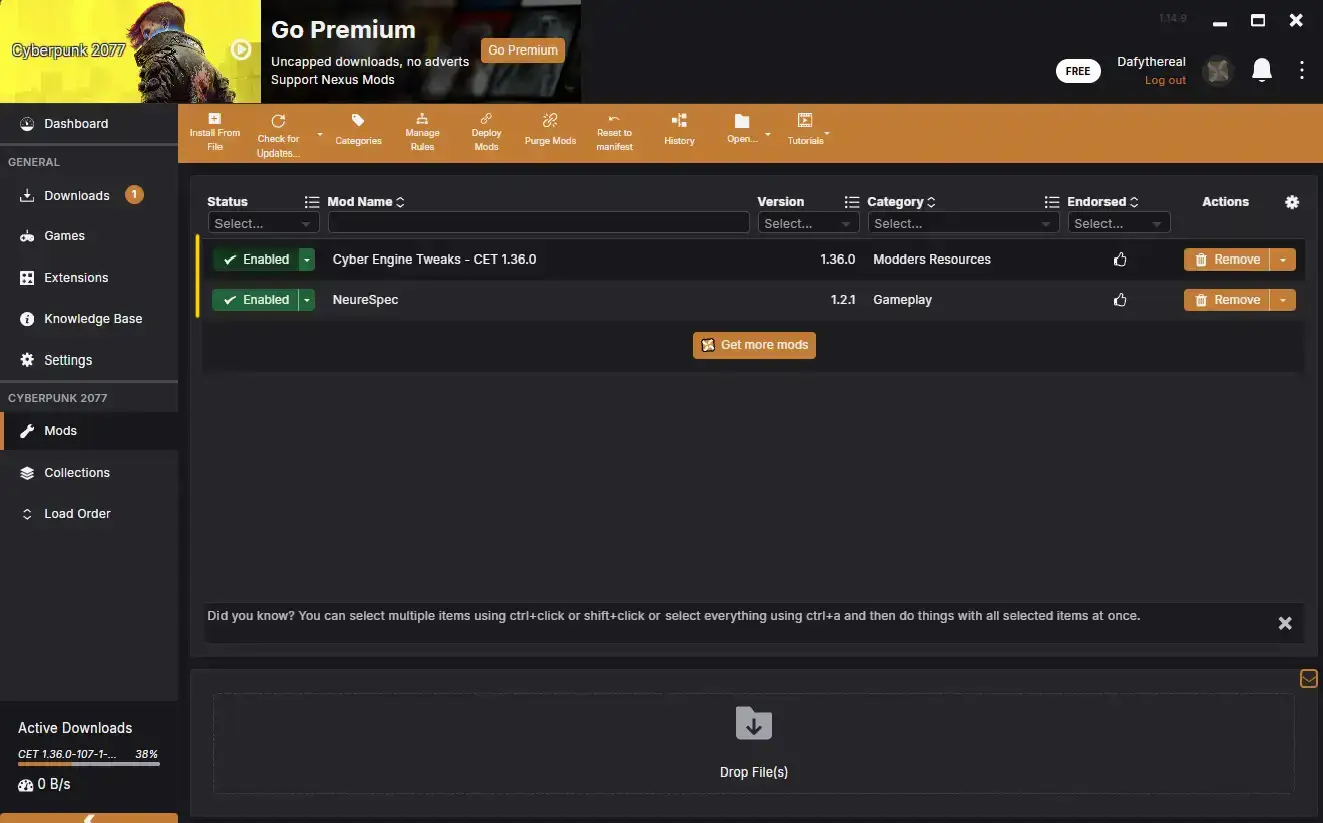
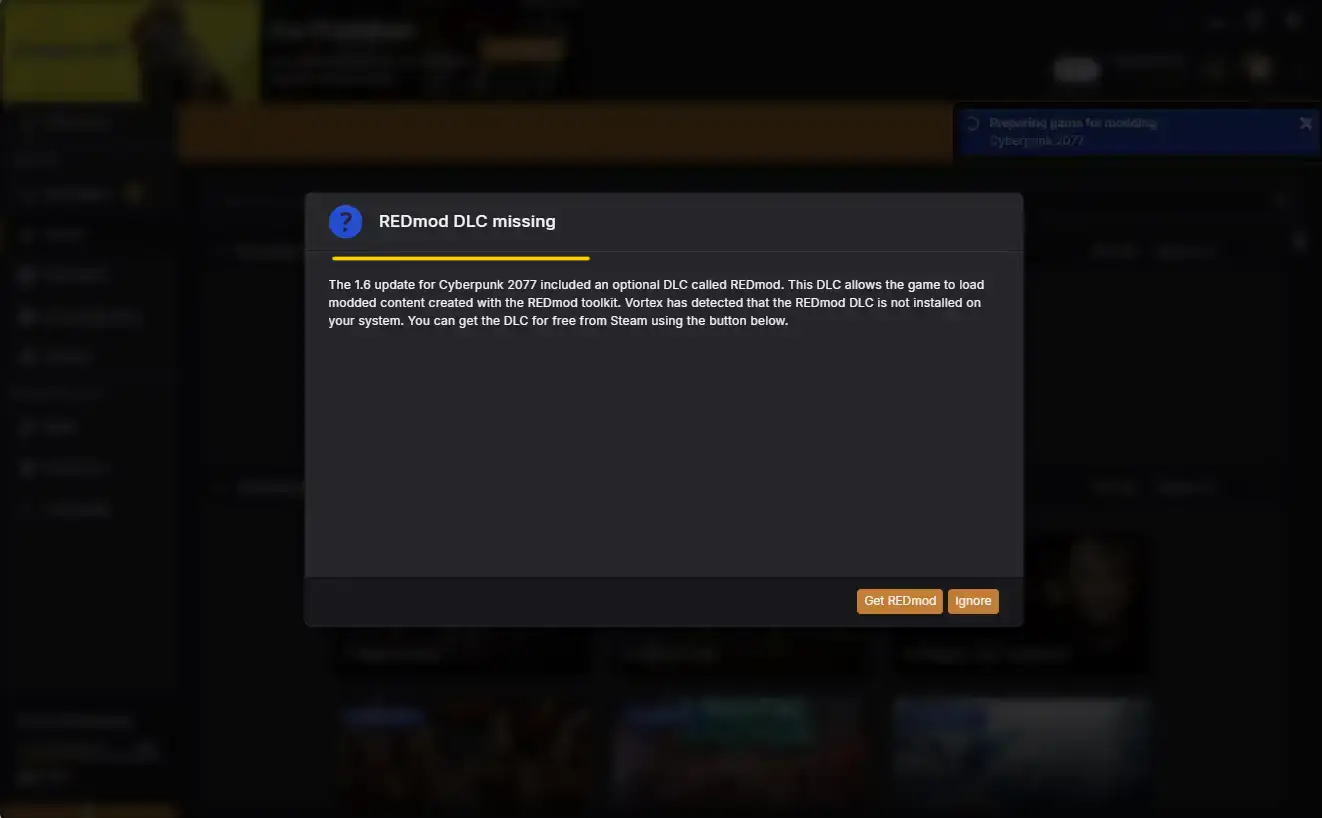
Important: always install frameworks, or libraries, BEFORE adding gameplay mods. Vortex warns about missing dependencies, but it is better to start installing Cyberpunk mods on an already prepared foundation.
Method 2: how to manually install mods
Framework installation order
To learn how to install Cyberpunk 2077 mods manually, start by installing these frameworks strictly in this order:
- RED4ext – Script extender for the game engine.
- Cyber Engine Tweaks – Framework for console and scripts.
- redscript: a framework for compiling scripts.
- TweakXL: an extension to the game’s tweak system.
- ArchiveXL: an asset-loading framework.
This order is important because each next framework builds on the previous ones.
Manual installation process
Step 1: Find the folder with the game
- Steam: right-click Cyberpunk 2077, then select Manage > Browse local files.
- GOG: Use the GOG Galaxy file browser.
- Epic: Access through the Epic Games launcher.
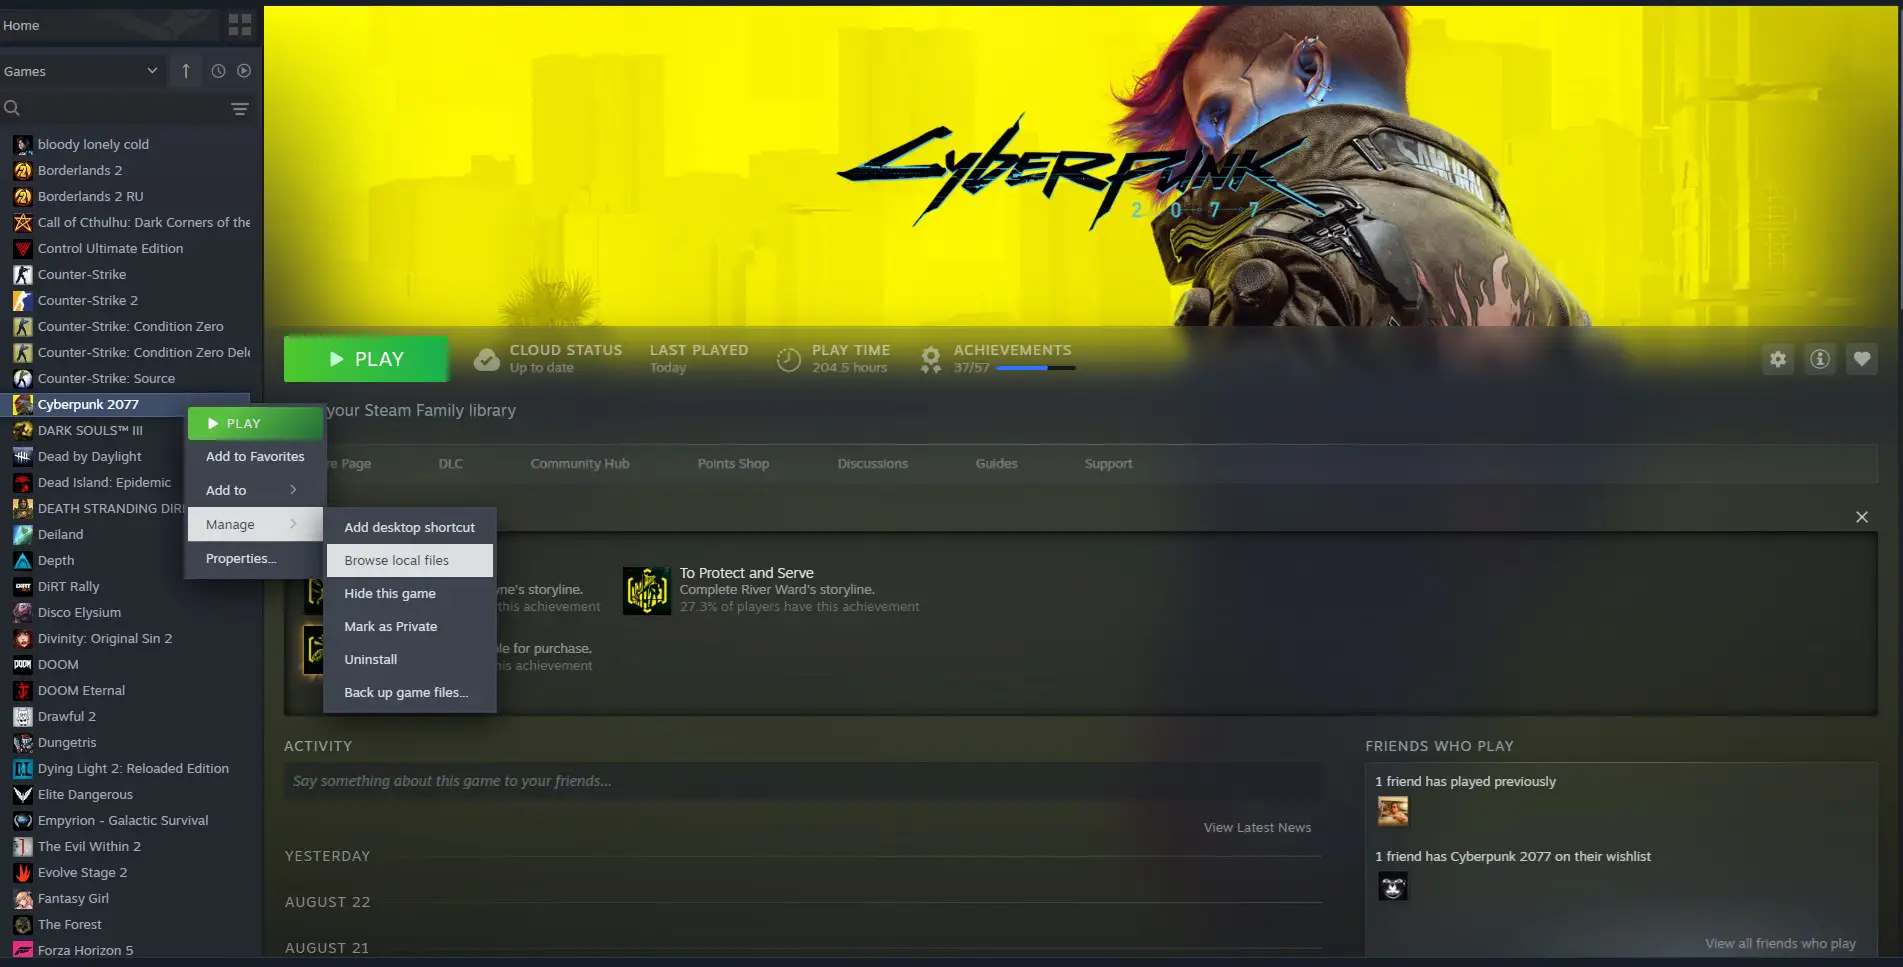
Step 2: Install the frameworks. Download each mod framework from Nexus Mods. Most require the following:
- Unpack the files.
- Drag the contents of the bin folder into your directory Cyberpunk 2077/bin/x64/.
- Some mods may require files in the root folder – always read the installation instructions.
Step 3: Install regular mods. They come in two formats:
REDmod format (newer):
- Contains an info.json file.
- Has folders such as archives and tweaks.
- Installed by placing the entire mod folder in Cyberpunk 2077/mods/.
Legacy format (old):
- Contains folders such as archive, bin, and r6.
- Merge those folders with the corresponding folders in the game directory.
Most popular mods still use the Legacy format, as it gives more options for modding.
Platform-specific setup requirements
Setting up the Steam version
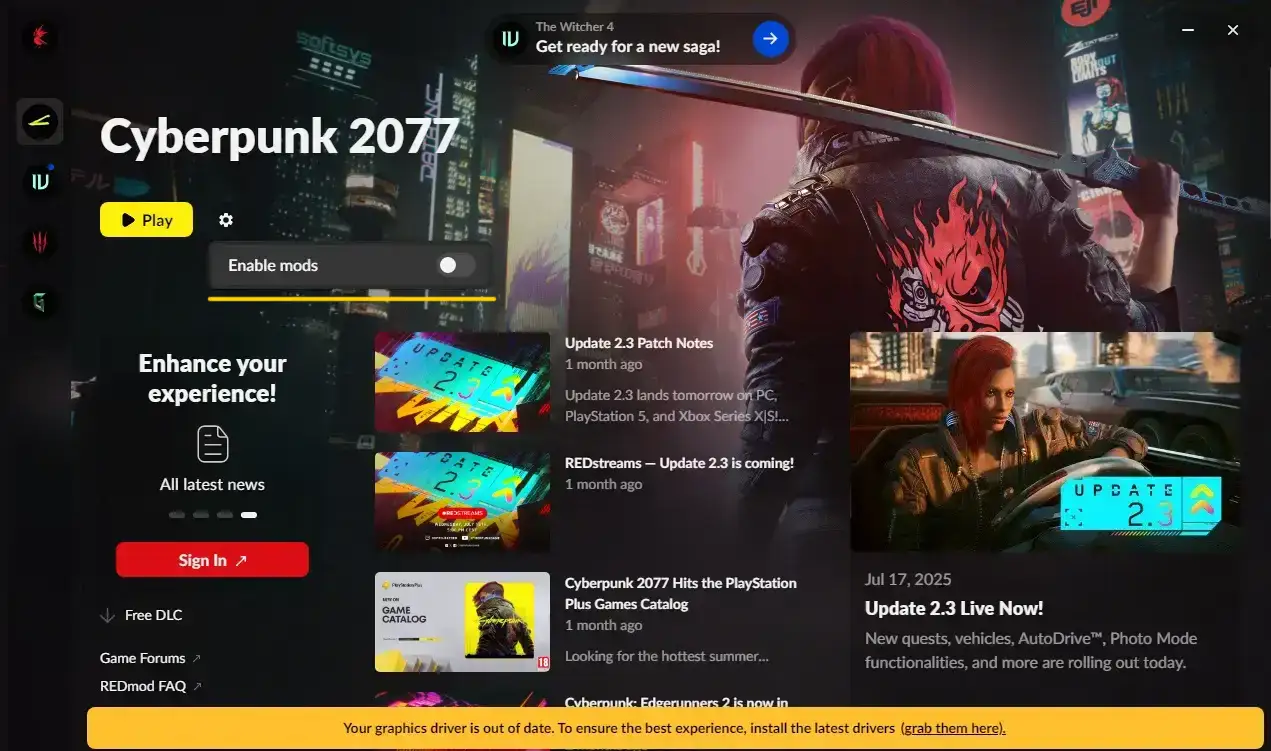
Steam needs some additional setup, so it is important to know how to install REDmod for Cyberpunk:
- Make sure REDmod DLC is installed and enabled in your Steam library.
- In the launcher of the game, click on the gear icon (settings).
- Turn on “Enable mods”.
- Run the game at least once after the mods are turned on.
Setting up the GOG version
If you want to install Cyberpunk mods through GOG, the process is similar, but you access the settings differently:
- Open the game’s page in GOG Galaxy > Settings > Manage installation > Configure.
- On the DLC tab, make sure that REDmod is ticked and installed.
- Enable mods in the game launcher settings.
Epic Games Store version
Epic follows the same scheme as Steam – install REDmod DLC and enable mods through the game’s launcher.
Understanding the frameworks and libraries
Understanding what these modding frameworks actually do will save you hours of troubleshooting.
- Cyber Engine Tweaks (CET) provides console access, using ~ or Insert in-game, and enables Lua scripting. Most advanced mods need it for their configuration menus.
- RED4ext is a script extender that adds entirely new functions to the game. Think of it as Skyrim’s SKSE; it is essential for gameplay mods.
- redscript Compiles and manages script modifications. It works together with RED4ext to ensure compatibility between different scripting mods.
- ArchiveXL resolves asset conflicts by allowing custom assets to load without overwriting game files. Without it, textures and models would conflict.
- TweakXL lets mods change game settings without editing core game files, making updates less disruptive to your setup.
Earlier in my Cyberpunk console commands guide, I mentioned how important these frameworks are to access advanced features. They are the foundation that makes complex modding possible.
Troubleshooting: when something goes wrong
Mods do not appear in-game after installation
Common causes include incorrect installation paths, missing dependencies, mod manager settings, game updates that break mods, and conflicts with core frameworks. Here are specific solutions:
- Make sure mods are in the correct folders. Most Legacy mods go in archive/pc/mod, while REDmod mods go in mods.
- Make sure mods are enabled in your mod manager, such as Vortex, and that Enable mods is active in the game launcher’s settings.
- Deploy the mods correctly through the mod manager. Mods usually require the action of “deploy mods”.
- Check for dependencies such as basic frameworks (REDmod, Cyber Engine Tweaks).
- Temporarily disable all mods and plugins to identify the conflict.
- Make sure the game files are fully updated and uncorrupted.
If mods still don’t appear, you may have to manually delete the residual files and re-install the mods.
Cyberpunk 2077 mods executable has crashed
The game is acting up. If Cyberpunk will not launch after installing mods, do not rush to uninstall it. The solution is usually simple; the key is to work systematically.
Is REDmod really enabled?
That’s reason number one. You could have downloaded it, but is it active? This is often overlooked on Steam.
- Right-click on Cyberpunk 2077 in the Steam library.
- Go to Properties > DLC.
- Make sure the checkmark is next to the Redmod.
- Check the game files.
Steam: right-click the game > Properties > Local Files > Verify integrity of game files.
GOG: find the game > click the settings icon > Manage files > Verify / Repair.
Epic: go to Library > the three dots next to Cyberpunk 2077 > Manage > Verify.
A common culprit: outdated core mods
If quick fixes do not help and Cyberpunk 2077 still will not launch after installing mods, outdated frameworks are almost certainly the problem. They are the first to break when CDPR releases a patch. You must update them before anything will work.
Update order:
- RED4ext
- Cyber Engine Tweaks (CET)
- redscript
- TweakXL & ArchiveXL
- Codeware
Go to Nexus Mods and download the latest versions of all these mods.
Cleaning up old files
Sometimes old files get in the way of work. Do the following:
- Go to the Cyberpunk 2077 directory.
- Delete the entire r6/cache/modded folder. It is a cache, and the game recreates it at the next launch.
- Remove any cybercmd files; it is obsolete and no longer needed.
- Check bin/x64/plugins for old .dll files left by removed mods.
Finding a problematic mod
If you have updated every framework and the game still crashes, use a process of elimination.
- Disable ALL mods. Launch the game. If it crashes, the problem is in the game itself.
- Enable only the core frameworks. Launch the game.
- Add back half the other mods. If the game crashes, the problem is in that half. Otherwise, it is in the other half.
- Keep dividing the mods into halves until you find the culprit.
Last resort: when nothing fixes the mod problems
If nothing helps, it’s time for a clean reinstallation.
- Delete the game through the launcher.
- Manually delete all remaining folders and files in the game directory.
- Install the game again.
- Install the basic frameworks.
- Slowly add the remaining mods.
Vortex-specific problems
Use hardlink deployment in Vortex settings. If Vortex breaks after game updates, try Purge and reinstall the mods.
Never mix Vortex and manual installation. Pick one. I recommend Vortex if you don’t know how to install mods.
Game crashes after installing mods
Delete the r6/cache folder and verify files through Steam or GOG. Check cyber_engine_tweaks.log in the game directory for errors.
What to check every time you install mods
Before modifying anything:
- Make a backup of the saves.
- Create a backup of a clean installation of the game.
- Read the mods descriptions.
How to do it right every time:
- Keep the mods list small at first.
- Update the framework immediately after the patches.
- Join modder communities (e.g., RED Modding Discord).
- Test the mods one at a time.
Once you have sorted out the technical setup, you will want to optimize performance so the game can handle the extra load. My Cyberpunk 2077 performance guide covers the settings needed to maintain stable FPS with heavy mods.
How to make mods work
Both Vortex and manual installation work reliably if done correctly. Vortex is great for beginners, and manual installation gives you full control.
The framework system may seem intimidating, but once you understand dependencies, you’ll have a stable foundation. Start small and test, test, test…
Still have questions?
Why do my mods break after every game update?
This is the most common complaint. Game updates break things because CD Projekt Red changes the internal code structure. Frameworks hook into game functions, and updates break those connections.
Solution: disable automatic updates. Wait 24-48 hours after a patch, then update RED4ext, CET, redscript, and the other core tools.
My mods do not appear in Vortex. what is wrong?
Usually it is the absence of dependencies or incorrect settings.
Solution: install ALL the main frameworks. Enable hardlink deployment and disable REDmod conversion in Vortex. Enable mods in the game launcher.
How do I know which content requires dependencies?
On the mod page on Nexus, there is a “Requirements” section. The order of installation is important: first frameworks, then gameplay mods. In this section, the authors specify the necessary frameworks.
Is Vortex better, or should I install everything manually?
- Vortex: Easy to control, auto-updates, suitable for large builds.
- Manual: Full control, no manager conflicts, better for debugging.
Vortex for beginners; manual installation for experienced users.
In 95% of cases, I recommend using Vortex.
Why does the game crash with custom content installed?
Reasons: outdated frameworks, lack of dependencies, conflicts.
Solution: update frameworks, clear r6/cache, verify the game files, and test mods one by one.
What is the difference between REDmod and Legacy?
- REDmod (new): The official tools, the /mods/ folder, are more stable but less capable.
- Legacy, older: uses archive/bin/r6 folders. It is more powerful but can be less stable. Most mods use Legacy.
Most popular mods use the legacy format.
How do I reinstall everything if it breaks?
- Turn everything off in Vortex and do a full cleanup.
- Manually remove the residues: r6/cache/, bin/x64/plugins/, mods/.
- Check the game files.
- Reinstall the frameworks.
- Add mods one at a time.
Which mods should I avoid?
Avoid SimpleMenu, Material and Texture Override, and outdated versions of any framework. Safe: Textures, clothing, updated popular tools.
How do I roll back to an earlier patch?
- Steam: use DepotDownloader.
- GOG: In the settings, disable auto-update and select the old version in version history.


